

How Do You Document Radiator Leaks for a Supplier Warranty Claim?
To document radiator leaks for a supplier warranty claim, build an evidence package that shows which radiator failed, where the fluid escaped, how the unit was installed and used, and what testing confirmed. Preserve the radiator in its failed condition and connect every photograph, test record, and purchase document to the same identifiable unit.
A photograph of coolant on the floor establishes a symptom. A dated close-up showing fluid emerging from a radiator seam, supported by the product label and a recorded pressure test, gives the supplier much more to assess. The difference matters because a radiator defect, a leaking hose connection, and damage during handling may require different claim routes.
What each type of evidence can—and cannot—prove
Different records answer different questions. Purchase documents establish the supply relationship; installation records explain operating conditions; photographs locate visible damage; testing helps confirm the leak source. A useful submission combines these records without claiming that any single item proves the cause.
Use the evidence needed to resolve the uncertainty. A clearly visible seam leak may need straightforward documentation. A leak that occurs only after warming up, or appears near several connected components, usually needs a more detailed inspection.
Preserve the condition before cleaning, removal, or repair
Stop operating equipment when coolant loss makes continued use unsafe. Allow the system to cool and follow the equipment’s isolation procedure before inspection. Never open a hot, pressurized cooling system to obtain a photograph.
Capture the radiator as found before disturbing it. Include the surrounding hoses, clamps, mounting brackets, fittings, and any impact marks. Photograph deposits and staining before wiping them away: their pattern may help trace where fluid travelled, even though residue alone cannot confirm an active leak.
Cleaning can make a fresh leak easier to see, but document the original condition first and record what was cleaned. Avoid sealants, soldering, welding, crimp adjustments, or dismantling before the supplier has provided inspection instructions. These actions can alter the failure site and make the original cause harder to determine.
If an urgent repair or replacement is necessary, record the reason, photograph each stage, and retain the removed radiator and relevant parts. Tell the supplier promptly what was changed. Separate the need to restore operation from the question of which costs the warranty covers.
Connect the leaking radiator to the purchase
Photograph the complete product label and any serial number, batch marking, date code, or stamped part number. Keep a wider image showing where the label sits on the radiator so the close-up can be connected to the unit.
If there is no individual serial number, assign an internal claim reference and link it to the packaging label, receiving record, stock record, and installation record. Describe that reference as your own tracking number. A supplier part number identifies a product type; it may not distinguish one radiator from another.
- Include the purchase order, invoice, and delivery reference.
- Record the model ordered and the markings on the supplied unit.
- List receipt, installation, first-use, and leak-discovery dates where available.
- Record operating hours or mileage when relevant and supported by records.
- State whether the radiator was supplied directly or through another seller.
Keep gaps visible rather than filling them with estimates presented as facts. For example, an unknown installation date should remain unknown. Consistent, traceable records are more useful than a complete-looking timeline built from assumptions.
Photograph the source of the leak, not just the wet area
Coolant can run down a hose, follow a bracket, or collect beneath the radiator. The lowest wet point may be some distance from the source. Begin with an overview of the installed unit, then take closer images that show how the suspected failure point relates to nearby connections.
A practical photo sequence includes the complete radiator, its identification markings, the surrounding installation, the suspected leak area, and a close-up of fluid emerging. Add a ruler or other scale reference where useful, without touching or obscuring the damage.
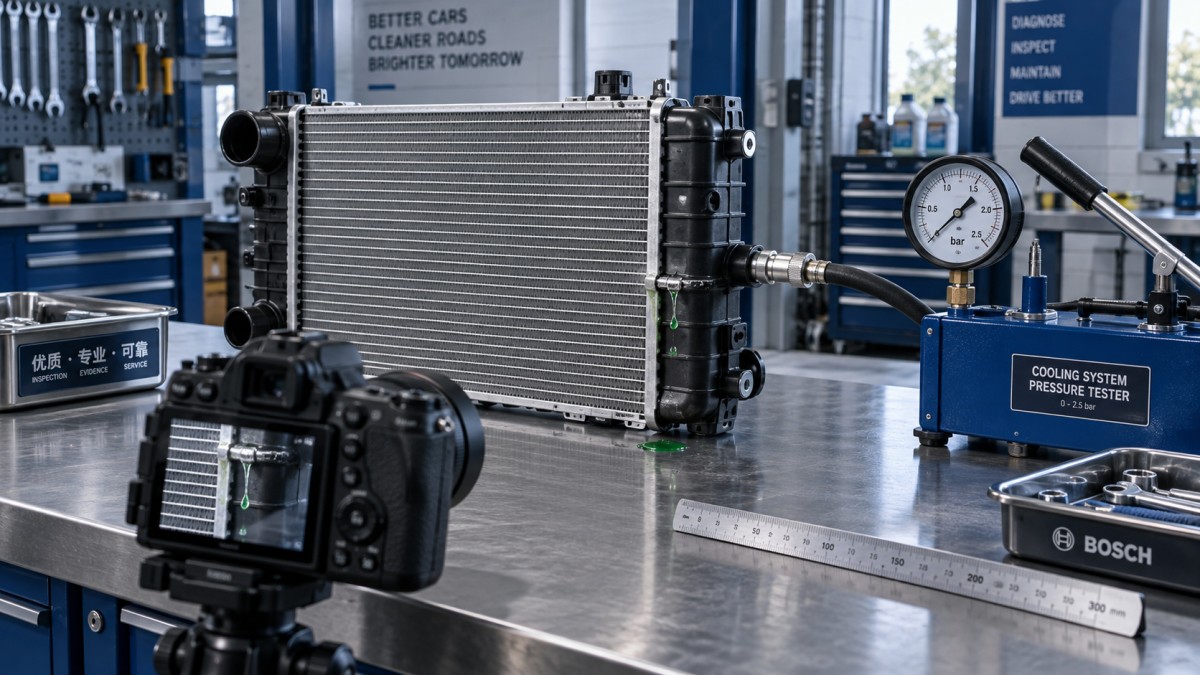
Keep original image files. Use annotated copies to mark the suspected location, while retaining unedited versions for review. Record capture dates in the evidence log; image metadata can support the timeline but should not be the only date record.
A short, continuous video can strengthen the record when a still photograph cannot show fluid forming. Show the unit identity or claim tag, the test setup, and the leak site. If the leak is intermittent, record the conditions when it appeared and when it did not.
Choose between an installed test, a bench test, and further inspection
Testing should answer a specific question: does fluid escape from the radiator itself, and under what conditions? Use the procedure and pressure limit specified for the relevant radiator or cooling system. Do not increase pressure simply to produce a visible failure.
An installed test preserves operating context
An installed cooling-system pressure test can help locate leaks while hoses, fittings, and mounts remain in place. It is useful when the source could be a connection or when installation stress may be relevant.
Its limitation is that a pressure drop does not identify the radiator as the failed component. The test adapter, hoses, cap arrangement, and other parts can also leak. Record the exact point where fluid appears, together with the checks made on nearby components.
A bench test can isolate the radiator
Testing a removed radiator can make an obscured seam or tube easier to inspect and separate the unit from other cooling-system components. However, removal changes the mounting conditions and may alter the symptom.
Photograph the installation before removal and document how openings were sealed for testing. Leakage from a temporary plug or adapter should be distinguished from leakage through the radiator. Use a qualified technician and an appropriate procedure; improvised compressed-air testing can introduce hazards and damage.
Further inspection is useful when the cause remains disputed
A workshop report may help when photographs and testing confirm a leak but do not explain its origin. Useful findings describe the observed condition, the methods used, and possible alternative causes. Destructive examination should follow an agreed process because cutting or opening the failed area changes the evidence.
A cold test may not reproduce a leak that appears only with heat, vibration, or load. Record that limitation instead of treating a passing cold test as proof that the radiator is sound.
For any test, document the operator, date, equipment, test medium, pressure with units, duration, temperature condition, observed leakage, and relevant procedure. Include instrument identification and calibration status where available or required by the claim process.
Separate observations from conclusions about responsibility
Describe what happened before assigning a cause. “Fluid formed at the tank-to-header seam during the recorded test” is an observation. “The factory made a defective seam” is a conclusion that may require further examination.
Several failure patterns can look similar in photographs but lead to different assessments:
- Seam or joint leakage: document the precise origin, surrounding condition, and test behavior. The location supports investigation but does not establish the cause by itself.
- Hose-neck leakage: show the hose seating, clamp position, neck condition, and where fluid first appears.
- Impact damage: photograph dents, punctures, packaging damage, and the unit’s condition at receipt.
- Corrosion or deposits: provide coolant and maintenance records rather than inferring fluid suitability from color.
- Mounting-related cracking: record bracket alignment, clearances, contact points, and any modifications.
Include coolant specification, mixing or dilution records where relevant, installation work orders, cap specification, and any overheating or freezing events. These details help distinguish product failure from conditions that may have contributed to it. If an event’s timing is uncertain, state the sequence you can support.
Check the warranty route before requesting a remedy
A well-documented leak does not automatically establish warranty coverage. Review the applicable terms for the coverage period, its starting event, notification deadline, exclusions, required inspection, and return process.
Distinguish a suspected manufacturing defect from transport damage or an incorrectly supplied model. Packaging photographs and delivery records may be central to a damage claim, while dimensional records and order specifications may matter more when the radiator does not fit. Notify the supplier promptly even if the technical evidence is still being assembled.
Separate the requested radiator remedy from related expenses. Replacement, credit, or refund may be assessed differently from labor, coolant, freight, downtime, or damage to other equipment. Itemize those amounts and attach supporting records without assuming that approval of the part claim includes them.
Before returning the radiator, obtain the return authorization, destination, packing instructions, and any agreed inspection arrangements. Document its condition before dispatch and use packaging that protects the failed area. Draining and shipment preparation should follow the applicable handling requirements and agreed return instructions.
Submit a package the supplier can review without reconstructing it
Lead with a short factual summary: the unit identity, purchase reference, failure date, observed leak location, tests completed, and requested remedy. Attach an evidence index that lets the reviewer find each supporting record quickly.
- Claim summary: what failed, when it was discovered, and what action you request.
- Identity and purchase records: labels, order documents, invoice, and delivery evidence.
- Installation and service history: application details, work orders, coolant records, and operating history.
- Leak evidence: dated photographs, video, and test report.
- Preservation and costs: storage location, changes made after discovery, and itemized expenses.
Use filenames that include the claim reference and describe the content. Keep units consistent and explain abbreviations. When several radiators are affected, give each unit its own entry and distinguish confirmed leaks from units awaiting inspection. A shared batch code supports traceability; it does not prove that every unit has the same fault.
If the claim is rejected, ask which finding or warranty condition supports the decision. Request the relevant inspection record and respond to the specific evidence gap. Before authorizing repair, disposal, or destructive examination, agree how the findings will be recorded and whether the radiator must remain available. That preserves the opportunity for a meaningful review.
 China Manufacturing PMI Falls to 49.3 in OctoberChina manufacturing PMI fell to 49.3 in October, signaling renewed contraction. Explore the role of weak export orders and domestic demand.
 Can you trust flexible packaging market intelligence forecasts?Can you trust flexible packaging market intelligence forecasts? Learn how to verify sources, challenge assumptions, and assess demand before making costly investment or sourcing decisions.
 When is supply chain disruption management consulting worth the cost?When is supply chain disruption management consulting worth the cost? Learn how to compare fees, avoidable losses, and recovery options to make a confident investment decision.
 How to use macroeconomic analysis to forecast industrial demandApply an industrial macro analysis methodology to forecast demand, interpret economic signals, and plan inventory and capacity. Discover practical steps for smarter business decisions.
 How to assess Singapore suppliers with global supply chain intelligenceExplore international supply chain intelligence Singapore buyers can use to verify suppliers, assess capabilities and delivery risks, and make confident sourcing decisions.
 Which macroeconomic indicators help forecast U.S. industrial demand?Explore industrial macro analysis USA decision-makers can use to forecast demand. Track new orders, inventories, and credit signals to sharpen procurement and capacity decisions.
 Can a food processing manufacturer meet your small-batch needs?Can a food processing manufacturer meet your small-batch needs? Discover how to assess minimum orders, costs, packaging, and safety to choose the right partner for your launch.
 How to verify sourcing intelligence data before selecting suppliersVerify sourcing intelligence data before choosing suppliers. Learn how to check company records, certifications, and capacity to reduce procurement risk and build a reliable shortlist.
 How to use supplier risk analysis to spot financial warning signsUse supplier risk analysis to spot cash flow pressure, debt risks, and delivery warning signs. Learn practical steps to reduce exposure and protect supply continuity.
 When dual sourcing makes sense in a sourcing strategy for manufacturersSourcing strategy for manufacturers: learn when dual sourcing strengthens supply continuity, reduces disruption risk, and protects production without adding unnecessary complexity.
 How bulk commodities pricing affects long-term supply contractsBulk commodities pricing shapes long-term supply contracts through index rules, freight, quality, volume, and currency risk. Explore strategies for resilient costs and supply security.
 Which global manufacturing trends by sector matter most for sourcing plans?Global manufacturing trends by sector: identify sourcing risks, supplier resilience, compliance demands, and cost drivers to build smarter, more reliable procurement plans.
 What industrial trade intelligence pricing should include before you subscribeIndustrial trade intelligence pricing explained: compare coverage, data quality, access rights, and workflow value before choosing a subscription that supports smarter trade decisions.
 How an industrial trade intelligence dashboard can identify new supplier marketsDiscover how an industrial trade intelligence dashboard helps identify new supplier markets by comparing capacity, landed cost, logistics resilience, and compliance risk.
 Which global market entry barriers should exporters assess first?Global market entry barriers exporters should assess first: tariffs, compliance, buyer qualification, logistics, and payment risk. Build a practical strategy for confident market entry.
 How trade data aggregation analytics can reveal emerging supplier marketsTrade data aggregation analytics reveals emerging supplier markets by connecting trade flows, capacity signals, logistics, and compliance insights for smarter sourcing decisions.
 When an export market analysis platform can validate demand in a new marketExport market analysis platform insights help validate new-market demand through buyer fit, regulations, logistics, competition, and profitable entry conditions.
 What is driving the beauty and personal care market in the USA?Beauty and personal care in USA is driven by targeted solutions, selective premiumization, digital discovery, clean-label trust, diverse needs, and compliance. Explore key growth opportunities.
 How trade flow monitoring reports reveal changing regional demandTrade flow monitoring reports reveal changing regional demand through import volumes, sourcing shifts, product mix, logistics signals, and regulatory trends. Explore actionable market insights.
 How international market intelligence for investors reduces market-entry riskInternational market intelligence for investors reduces market-entry risk by validating demand, regulations, logistics, and competition before capital is committed.
 How international sourcing intelligence helps identify supplier risk earlyInternational sourcing intelligence helps businesses spot supplier risks early, protect supply continuity, and make smarter global procurement decisions.










Global Trade Insights & Industry
Our mission is to empower global exporters and importers with data-driven insights that foster strategic growth.
Search News
Popular Tags
Industry Overview
The global commercial kitchen equipment market is projected to reach $112 billion by 2027. Driven by urbanization, the rise of e-commerce food delivery, and strict hygiene regulations.